02 Quick Start Guide
1 First data collection
1.1 Create a project
After you have started the SNH Titan Desktop, please click on "Your projects" and on the blue button "Create project".
Choose a project name, a case name that differs from it if necessary, and add a description if desired.
Under the "Tag Schema Template" item you get the option to add a few default tags to the project. You can either choose nothing and set up your tags on your own later, or select one of the templates.
If you want to import an SNH1 case, this is the right place to do it. Under the item "Import SNH1 project data", you can import an existing case. For more detailed information on importing SNH 1 cases, please go to "Switchover SNH -> Titan" in the manual.
1.2 Collect the data of a target profile
In your usual browser, search for a profile whose data (friends, timeline, etc.) you would like to back up with SNH Titan. Once you have found a profile, there are generally two ways to back it up in SNH Titan.
1.2.1 Target selection
1.2.1.a Using the Browser Extension
Provided you have installed the SNH Titan Browser Extension, you should already see a sidebar on the right side on the identified target profile.
 |  |
| In collapsed state, you will see a small preview of the identified profile. Click on this preview box to display the backup options. | In the expanded sidebar you will see the possible backup options. For a first "quick start", we recommend keeping the default values for the time being, unless your profile contains extreme amounts of data. For example, backing up a newspaper's Facebook page might be an inconvenient way to start, due to the enormous number of posts that need to be backed up. |
Click on "Send to SNH Titan" to send the backup job to the SNH Titan. Important: Allow the browser to access the SNH Titan!
The SNH Titan Desktop application will open and offer you a few more backup options. You will be asked to select a project. Here, the project you just created should be selected by default. You will also be asked to select a collection profile. More about this in step 1.2.2.
1.2.1.b Backup without browser extension
You can also start a backup without a browser extension. To do this, simply click Collection in the main menu of your open project. You will be asked to enter a URL. This is the URL of the profile you want to backup. For example, on Facebook this might look like this:
https://facebook.com/max.mustermann
or
https://facebook.com/profile.php?id=12345678
Please take this URL from your browser and copy it into the field provided. You can then set further options. More about this in the next step.
1.2.2 Select and create crawling profiles
In order for the SNH Titan to be able to correctly save the data in full, it must log into a so-called crawling profile. These are mostly profiles created specifically for this purpose on the corresponding social networks. Please note that these profiles can occasionally also be blocked. Therefore, never use your private profile for collecting data to prevent the loss and blocking of your main profile.
To provide the SNH Titan with the data to log into such a profile, please create a crawling profile in the SNH Titan. To do this, click on "Create crawling profile" under Crawling profile.
A sidebar will open. Please fill in the following data there:
| Name (irrelevant for login) | You define this name yourself to be able to identify the profile later in the software. For example, "Max Mustermann". |
| Username / Vanity Name / E-Mail | This is the username or email address, or occasionally the phone number, that you would use to log into the network if you were also logging into the browser. |
| Password | This is the password you use to log in. In special cases (e.g. Telegram or TikTok) the password can be left blank because other login methods are used. |
| Network | Select here for which network the crawling profile is valid. |
| Check login status | Here you can select whether the SNH Titan should directly check and update the login status of the profile in the background. This is optional and offers you the possibility to find out in advance if the profile you have selected has possibly already been blocked and if the specified data is valid. |
Click Save. You can now select the profile in the crawling profiles overview.
1.2.3 Further adjustment of the backup options
You can further customize in detail which data should be saved for the profile. This is particularly relevant to ensure data protection. Please only back up data that is relevant to your case or investigation. In particular, when backing up friends or friends of friends, make sure that the collection of this data is relevant. You can add or remove individual options by checking or unchecking the checkboxes.
1.2.4 Add more URLs
You can repeat the above steps as many times as you like to save multiple target profiles in one go. Click on "Add URL" to define additional targets. For each of these targets, you can customize your backup options and used crawling profiles. You can also add targets from different networks in one query.
1.2.5 Sending the task request
Click on "Send to server" to start the backup. The page will now refresh and after a few seconds you will see the status of the currently executed crawling tasks in the top right menu bar.
1.3 Waiting for results / explanation of basic concepts
While you're waiting for the backup, it's best to use the time to introduce you to a few new concepts of the SNH Titan. We'll briefly answer the question: What's happening in the background right now?
So-called collection servers run in the background of SNH Titan. These are separate processes that wait for the very jobs you have just submitted. As soon as you send a collection request, these servers start collecting data from the social networks. Depending on the license you purchased, one or three of these collection servers will run simultaneously in the background. This gives you the option of sending multiple task requests, which can be processed simultaneously depending on the number of servers. This speeds up the backup enormously. In particular, it gives you the opportunity to start several small tasks in addition to a long-running backup (e.g. the backup of a single profile in addition to the backup of friends). Furthermore, if you have already collected data, you can continue your analysis even though a task is running in the background. Below is a brief summary of the most important terms:
| Crawling task / task | An order to collect data from a target (e.g., profile or posting) on a social network |
| Collection server | A process in the background that executes the orders and collects the data and imports it into the SNH Titan |
| Crawling profile | A profile that SNH Titan uses to log into the social network. Only data accessible to this profile can be backed up by the SNH Titan. |
We collect the data in a way which preserves the crawling profile. Using various methods, we simulate "human" use of the browser to prevent the crawling profile from being blocked. However, this means that the backup may take longer than with other software. Only when the backup job has been completely finished, the data is inserted into your project and is available for further data analysis.
2 Data analysis
One of the strengths of SNH Titan is the visualization of the collected data. There are several areas within the software for this purpose.
2.1 Explorers
There is a separate explorer for each of the 4 main SNH data types. These are profiles, media items, postings and chat messages. Within the explorers, different data is displayed, but the principle of operation is relatively similar. The data explorers for each are tables, with a wide range of filtering and organization options. The number that appears above each main menu item indicates the number of objects of that type that have been collected. For example, in the screenshot below we see that 3,557 profiles have been collected.
2.1.1 Simple view
The first time you open a data explorer, e.g. the Profile Explorer, you will see the data collected so far in this project in table form. The Data Explorer is divided into two main areas, the menu and the table view.
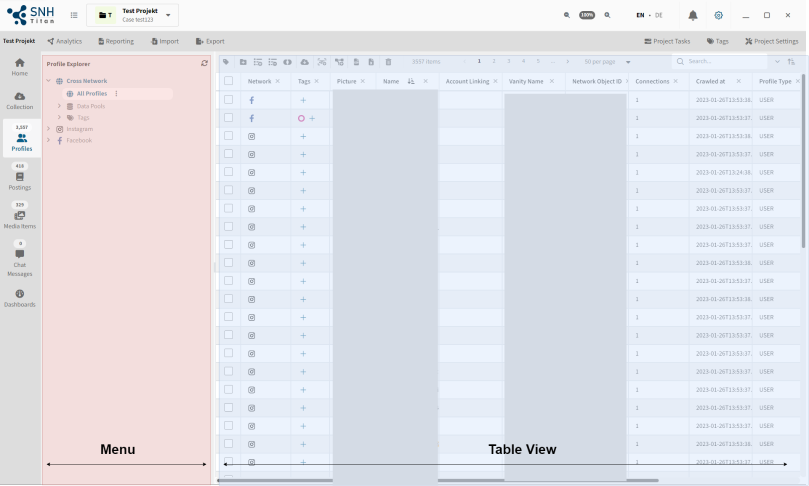
The structure of the SNH Titan Data Explorer
The menu helps you to filter the data quickly. By default you will see all the collected data. You can see this on the left side, as the item "All profiles" is activated.
In the current menu you will see the data pools (more about that in a moment) related to a network, as well as the tags you have already assigned.
You now have a separate submenu per network, which can be opened by clicking on it and is again structured like the first menu.
Important: You will only see menu items for networks for which data has already been collected!
You will again see your data pools, your tags, but also your target profiles collected so far.
2.1.2 Friends and connected profiles
If you unfold the target profiles, then you will get a choice of "Friends" or "All connected users". Below is a brief explanation of the differences:
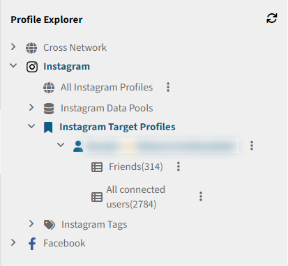 | Friends | Under the Friends menu item you can see all users who have a friendship with the collected profile. In Facebook, this means an assumed bidirectional friendship, or in Instagram, for example, that one person follows the other. |
| All connected users | Besides an explicit friendship, users can also be connected in other ways. For example, a user is connected to another user if he has reacted to a post of the target person or has commented on a post. Also connected are users who have mentioned each other in posts, or shared a target's post. There are more of these connections, which will also be explained in detail later in the manual. |
Click on one of the two menu items to view the corresponding connected users in the table view.
2.2.3 Postings
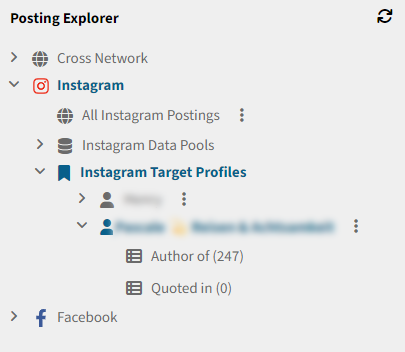 Example of the menu structure in the Posting Explorer
| To view all saved postings, click on "Postings" in the menu. Again, all postings are loaded first, regardless of the network. You can then select by the corresponding networks in the menu. If you would like to see all postings that a specific profile has written, you must first define this profile as the target profile. If it is the target profile you have collected, then it will have already been automatically marked as a target profile. You will then see it in the menu under, for example, "Instagram target profiles". Then unfold your target profile and click on "Author of". You will then only see your target profile in the author column. This means that all the posts that are now displayed were written by the target profile you selected. |
2.2.4 Media items
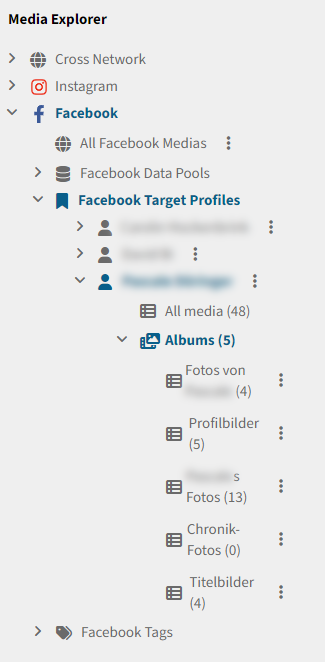 Example of the Media Explorer menu structure
| To view all media, click on the "Media" menu item. Here, too, you will first be shown a list of all media. Media are all images and videos that have been collected so far. Not included are profile pictures, as these are usually not collected as separate media, unless a profile picture is also part of an album or the timeline of a target profile. If you want to view a person's media, you can go back over the network, unfold the target profile, and then have the choice of either viewing all of the person's media, or viewing the media per album by unfolding the "Albums" submenu item. |
2.2.4 Chat messages
The menu structure for chat messages is also based on the previous menu structures. To select the chat messages of a specific person, simply select your target profile in the menu structure and display the corresponding chat messages. If you want to display all chat messages from a group (e.g. in Telegram), simply select the group in the navigation.
2.2.5 Detail view
If you want to see more details for one of the objects (profile, posting, media or chat message), click once on the object in the table. A sidebar will open where you can see all the collected information of the profile. There you can also manually mark a profile as a target profile so that it appears in the left side. To do this, click on the bookmark icon at the top right.
 | This icon means that the selected profile is not a target profile yet. |
 | This icon means that the selected profile has now been marked as a target profile and should appear in the Explorer menu. |