04 Profile Manager
What is a crawling profile?
A crawling profile is used to view private content on social networks. The runner uses your login credentials to log in to the social network. You can use the same crawling profile in different projects. Each social network requires its own crawling profile.

Overview of a crawling profile
The network icon of a profile shows for which social network the crawling profile was created. Each crawling profile has its own profile name, login data for the selected social network and a login status.
In which projects can I use my crawling profile?
Crawling profiles are project-spanning. Once created, they can be used in all projects you create.
Which social networks are supported?
Currently, you can create a crawling profile for the following social networks: Facebook, Instagram, Twitter, Telegram, Youtube, Odnoklassniki, TikTok, VKontakte.
Crawling profile management
How do I create a crawling profile?
There are two ways to create a crawling profile: You can either create the crawling profile directly in one of your projects or in the settings menu. In both cases, the crawling profile can be used across projects.
Variant 1: Opening the input mask within a project.
Starting from the home screen of your project, first click on the Collection icon to get to the Collect Data screen.

Home screen of a project
To create a crawling profile within a project, first select the "Collection" icon in the menu on the left side of the screen. Then select the "Add Crawling Profile" button.

Collect Data view of a project with open sidebar for creating a new crawling profile
Variant 2: Opening the input mask in the settings.
By clicking on the gear wheel in the upper right corner of the screen, you can access the settings. Under "Crawling Profiles" you will see all the crawling profiles that have already been created. Clicking on "Create new crawling profile" opens the input mask.

Overview page of all created crawling profiles within settings
Input mask for new crawling profiles
Enter the following data in the input mask that opens:
Name (irrelevant for login) | You define this name yourself to be able to identify the profile later in the software. For example, "Max Mustermann". |
| Username | This is the username or email address, or occasionally the phone number, that you would use to log into the network if you were also logging into the browser. |
| Password | This is the password you use to log in. In special cases (e.g. Telegram or TikTok) the password can be left blank because other login methods are used. |
| Network | Select here for which network the crawling profile is valid. |
After you have specified a network, you can decide by clicking the checkbox that appears, "Check login status after saving", whether Maltego Evidence checks whether login to the selected network is possible with the specified data after saving the crawling profile.
If the login with the crawling profile is not successful, first check if the the entered data is correct. If your crawling profile has been blocked by the social network, try another profile.
How do I test the status of a crawling profile and what does it mean?
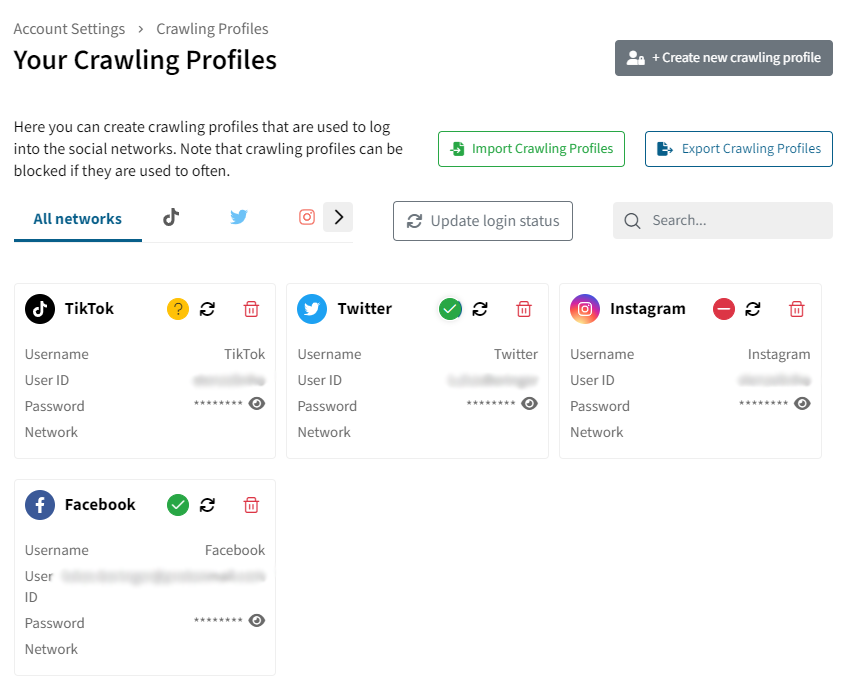
In the settings you can see the status of your crawling profiles. To do this, click on the gear wheel in the upper right corner of the program. The overview of your saved crawling profiles will open. Each tile corresponds to a crawling profile.

Overview of all available crawling profiles
There are three different login statuses. Their meanings are the following:
| The last login was not successful. This can either be due to incorrect login data or the profile was blocked in the social network. | |
 | The login status is unknown and must first be determined. |
 | The last login was successful and the profile can be used. |
| By clicking |  | you can have the login status of a crawling profile queried again. |
How do I edit a crawling profile?
You can edit the login data and the name of your crawling profile at any time. To do so, click on an empty space within the tile of the corresponding crawling profile in the overview of your crawling profiles. An input mask will open, similar to the one used when creating a crawling profile. The data of the crawling profile is already entered in the corresponding fields and can be edited. If you change the social network of the crawling profile, you can use a check box to decide whether the system should check the login status after saving the crawling profile.

Input mask for editing a crawling profile
You can save any edits by clicking the "Save" button.
How do I remove a crawling profile?
 | By clicking on this icon you can delete a crawling profile. |
Deleting a crawling profile does not automatically delete the data collected with it. A deleted crawling profile cannot be restored, but must be added again.
How do I import crawling profiles from SNH Classic?
You can import your crawling profiles from SNH Classic into Maltego Evidence. Follow the steps below to do so:
| 1. | In SNH Classic, open a project that contains a crawling profile that you want to import into Maltego Evidence. |
| 2. | Click on "Utilities" in the menu bar and then on "Profile Manager". |
 Menu bar within a project in SNH Classic | |
| 3. | Click the Export button to export all created crawling profiles as a file. |
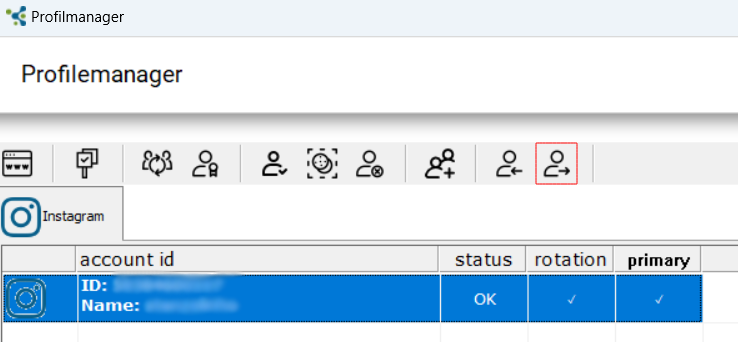 Profile manager toolbar, with the button for exporting the crawling profiles in red.
| |
| 4. | In the window that opens, specify a location for the exported profiles. |
| 5. | Open the crawling profile overview in Maltego Evidence. To do this, click on the gear in the upper right corner. |
|  Overview of all saved crawling profiles |
| 6. | Click "Import Crawling Profiles". In the window that opens, click "Select file". |
 Pop-up window after clicking the "Import Crawling Profiles" button
| |
| 7. | Now click on "Select file" and select the previously saved file. By default, the name of the file is: profilsnh1.snhpp |
| 8. | Select whether you want to overwrite already existing profiles with the same ID and whether you want the program to check the login status of the imported crawling profiles after importing. When you have made your selection, click the Import button to complete the import. |
 Closing window for import of crawling profiles
| |
| 9. | If the import was successful, your imported crawling profiles will now be displayed in the overview. You will also see the following message in the lower right corner of the screen: |
 Status message on successful import of crawling profiles |